Thursday, November 20, 2014

The Gift of Reading

I truly believe that reading is a gift that we, as teachers, give our students.  We give this gift each day when we teach student sight words, vocabulary, and comprehension strategies.  We give the gift when we get excited about the read aloud book that day.  We give that gift when we recommend books to our students.  We give that gift when we hang on their every word as they share about the books they are reading.

In appreciation for all that you do each day to promote the love of reading, I am participating in the Gift of Reading blog hop.  Each blogger has posted a freebie (for the duration of the blog hop) and also has a giveaway going with a Rafflecopter.  Enjoy the freebies and best of luck in the giveaways!


In the current issue of Reading Today, Brenda Overturf cited a disturbing statistic in her article "Interrupting the Cycle of Word Poverty:"
       "According to a the most recent report of the National Center for children in Poverty, 45% of
        children in the United States live in low-income households.  Twenty-two percent live in actual
        poverty."
Children from low income environments hear less words than children coming from professional households "creating a 32 million word gap between children in poverty and their more affluent peers before even starting school."  How can we combat this tremendous gap?  She recommends creating "an environment where students are immersed in though-provoking vocabulary, [reading] intriguing text aloud, [playing] games with vocabulary, and [encouraging] students to think about words in metaphorical ways."

All of that sounds great, but how does that look in a classroom?  How do you make that happen with everything else that you are supposed to be doing on a daily basis?  My dear friend and I came up with a strategy to explicitly teach students vocabulary.  We call it "Interactive Vocabulary."  I had the pleasure of presenting this strategy with her today at our state reading conference.  Below you will find a packet of information that breaks down each step in the strategy.  The packet of information will be a forever freebie.  Below that you will find the mini-unit I taught my third graders that uses this strategy (freebie for this weekend only).  The unit shows the vocabulary strategy in action with example think alouds and activities that help the students make the words their own.

http://bit.ly/PN1h9y


http://bit.ly/1x7D1R0


I hope that you give the strategy a try!  Don't forget to complete the rafflecopter entries for $10 Teachers Pay Teachers gift certificate.  Check out the next stop in the hop by visiting JD's Rockin' Readers.

http://www.jdsrockinreaders.blogspot.com/2014/11/gift-of-reading-blog-hop.html

a Rafflecopter giveaway

Thursday, October 2, 2014

Harvest of Freebies

Fall is here (well...it is supposed to be in my part of the world).  In celebration, a group of bloggy friends and I got together to created a A Harvest of Freebies Blog Hop.  Hop through each blog and harvest your freebies.  Some of them are for this weekend only, so don't wait!


When I was getting my Masters in Reading, one of the classes I had to take was a summer reading camp for children in the surrounding area.  The teachers were split into groups of four to five.  Each group was given around ten children.  At that moment, I was a middle school teacher.  My college professor wanted us to get experience working with a grade level different from our own, so my students were all soon-to-be second graders.  This was my first experience working with younger students, and it was a blast!  Each teacher in my group "adopted" two of the students.  I worked with a boy and a girl who were adorable!  After giving them some assessments to figure out what we needed to work on, I found out that they need work on sight words.  This was summer camp, so it needed to be fun.

The other teachers and I talked and we decided sight word bingo would be the way to go.  Each student is given a blank card.  In each box of the blank card, they wrote sight words from a given list.  The teacher had a master list of sight words on index cards.  The teacher would say a word.  If the student had that word on their card, he or she put a marker over that word.  Five in a row wins.  We used a variety of markers:  beans, buttons, candy, etc.  The students loved playing this game.  We would end every day of summer camp playing this.

Would you like your own copy?  Click on the picture below.  In the file, you will get a blank cards that are themed for fall and Halloween and every sight word on the Dolch Word list (color coded).  The word lists are sized to be printed on labels and placed on index cards or you can print them on card stock and laminate.  There are also some blank cards, so you can add your own words.

https://drive.google.com/file/d/0B2mcLkXWilsFR2tTb0pTTFZsQUE


https://drive.google.com/file/d/0B2mcLkXWilsFR2tTb0pTTFZsQUE/edit


Come back and see me anytime.  Stay up to date by following me on Bloglovin.

http://www.bloglovin.com/en/blog/5192339


Continue on your harvest by visiting Reading and Writing Redhead:

http://www.readingandwritingredhead.com/2014/10/harvest-of-freebies-blog-hop.html

Thursday, August 21, 2014

Back to School Writing Tip

Back to school is a wonderful time of the year.  Fresh ideas, fresh faces, and a fresh start.  Join my literacy friends and I in a wonderful hop "Blasting Off a Great Year!"


I have a simple idea for you today to help spice up your students' writing.  I have been in school for almost a week and have an idea of the writing strengths and weaknesses of the kids in my school based on the writing samples the teachers have collected this week.  One weakness that always gets kids is being more descriptive in their writing.

One way I help my students be more descriptive writers is by teaching them the "show, not tell" technique.  I display a sentence on the Elmo like "My room is a mess." I explain to my students that using this sentence in my writing tells the reader that the room is a mess but doesn't help the reader see my room. What I think is a mess might not be a mess to someone else. I need to help my reader visualize my room by showing them in words that my room is a mess. I use the five senses to help students really think about what a messy room might look like. Then I model writing what what we talked about.

My model might look something like this:

I wish I had a maid. My floor is so littered with clothes my hangers feel lonely in the closet. My bed is hidden under a pile of more clothes, school books, lost homework assignments, and DVDs. Looking under the bed, I see empty cups and plates that need to be taken to the kitchen. The vacuum has not graced my room with its presence in over a year, so I have a whole generation of dust bunnies living in the nooks and crannies. My cat has rolled over the top layer of my bed so many times that the clothes look white and grey. I have pushed things to the side in an effort to create a trail from the bed to the door. My mom is going to kill me when she comes for a visit. I can hear her now, “I raised you better than this.”

We discuss the difference between "My room is a mess" and the paragraph that shows the mess.  I give students a telling sentence and have them practice working in groups to creating a showing paragraph.  Then I want them to apply it to their own writing, so I have them reread a piece they have been working on and pick out a telling sentence.  They write a few sentences (up to a paragraph) that show instead of tell.  Finally we add "Show, Not Tell" to our revising strategies list.

I have a lesson plan that goes with this idea HERE.

http://www.teacherspayteachers.com/Product/Show-Not-Tell-Lesson-Plan-225883


I hope you enjoyed this activity.  For the next activity, check out The Reading Tutor


http://thereadingtutorog.blogspot.com/2014/08/blasting-off-great-year-with-high.html


Saturday, August 16, 2014

Beginning of the Year Science Activities

Are you looking for some great ideas to get your year started?  You are in the right place.  It is time for the monthly Bright Ideas Linky.   I hope that you have enjoyed the others as much as I have.  If you missed them, no fear, check out my posts HERE and HERE and HERE and HERE.  I have filed away a ton of useful ideas for this year!


In my role as a math and science instructional facilitator, I have been looking for easy, low-prep, engaging science activities that my teachers can use at the beginning of the year to get the kids excited about science class.  Today I am going to share with you three activities that fit this bill.  The toothpick and paperclip ideas I learned at a great science professional development this summer and the cups challenge was one that I saw in multiple places as I searched for STEM ideas.

Toothpick Star

What you need:
  • five toothpicks
  • dropper
  • wax paper
  • water

What to do:
  • Break each toothpick almost in half.
  • Lay the toothpicks in a star shape.
  • Using the dropper, place one drop of water at a time in the center.

Science behind it:
-->
Wood is made up of various types of tissue, which provide strength and a transport system for water and dissolved minerals from the roots up to the leaves.  Capillary action combined with transpiration from the leaves provides the force required to transport water vertically.  Capillary action is the result of the strong surface tension of water causing it to rise vertically up narrow capillaries. The height to which water will rise in a capillary depends on its size and the material it is made from. Capillary action can also be observed by dipping the bottom of a strip of paper towel into water.

This is a video I took with my iPhone as we did this at a teacher workshop this summer.


Floating Paperclips

What you need:
  • bowl
  • paperclips
  • water
  • various objects:  plastic spoon, tissue paper
What to do:
  • Fill the bowl with water.
  • Place the paperclips on top of the water (not as easy as it sounds)
Hint:  I used a spoon.  Other teachers put a little piece of tissue paper on the water and then carefully placed the paperclip on the tissue paper.  They slowly pushed the tissue underwater.  Some of the teachers were able to just use their hands to get the paperclip to float.


Science behind it:
--> Surface tension is like a skin on the surface of the water where the water molecules hold on tight together. If the conditions are right, they can hold tight enough to support the paper clip. The paperclip is not truly floating; it is being held up by the surface tension. Many insects, such as water striders, use surface tension to walk across the top of the water in a pond or stream.
Questions that students can build experiments to answer:
  • How many paperclips can the surface hold?
  • What liquids have the strongest surface tension? 

Cups Challenge

During the professional development I lead with my teachers this summer, I wanted to give them low-prep ways to engage their students in STEM challenges to begin the year.  The Tower Cup Challenge was one of the easiest that I could find.

What you need:
  • set number of cups per group (I used 25)

What to do:
  • Give the same number of cups to each group.
  • Tell them:  Your challenge today is to build the tallest tower using all of the cups.
  • Give them 2 minutes of silent think time.  They cannot touch the cups or talk to their group.  2 minutes is a long time (even for teachers to stay quiet) but they need the time to really think about what might work.
  • Give them 5 minutes of group planning time.  They still cannot touch the cups.  They can talk.  They can draw different ideas on paper.
  • Give them 10 minutes of build time.  Give them the entire ten minutes.  Towers will fall and reemerge many times, so they need all the time.  The team with the tallest tower at the end of time wins.
  • You can discuss at this point or give them another ten minutes to redesign and try again.


If you enjoyed this bright idea, please consider joining me on Facebook, Instagram or Twitter for more great ideas.

For bright ideas from more than 100 different bloggers, please browse through the link-up below and choose a topic/grade level that interests you. Thanks for visiting!

Saturday, July 19, 2014

Building Fraction Kits

Yay! Yay!  One of my favorite times to read blogs during the month is here:  Bright Ideas Linky.   I hope that you have enjoyed the others as much as I have.  If you missed them, no fear, check out my posts HERE and HERE and HERE.  I have filed away a ton of useful ideas for next year!


Next year, I am changing jobs from an academic coach (supporting teachers in all subjects for grades PK-3) to an instructional facilitator (same concept, different name) for just math and science in grades 3-5.  I am very excited about the opportunity!  This summer I have been brushing up on different strategies and ideas that I can have ready when my teachers need help.  Today I am going to share with you a simple way to help students visually see fraction equivalence. 


Building a fraction kit just requires strips of different colored construction paper.  You can provide scissors but if you really want to keep it simple, then folding and tearing will get the job done.  Here is how it is done:


Step 1:
Choose five sheets of construction paper.  I used the regular size but you can use the larger type if you would like a bigger fraction kit pieces.  Cut the construction paper into small strips (like you see above).

Step 2:
Give each student five different color strips.  On the first strip all the students should do is write the number 1 in the middle.


Step 3:
Fold the second strip of paper in half and tear along the line (no scissors needed).  Write 1/2 on each piece of paper and place under the whole strip.


 Step 4:
Fold the third strip of paper in half and then in half again.  Then tear along each fold.  You should have four pieces.  Write the number 1/4 on each piece of paper.


 Step 5:
Fold the fourth strip of paper in half, in half again, and in half once more.  Tear along each fold.  You should have eight pieces of paper.  Write the number 1/8 on each piece.


Step 6:
Fold the fifth strip of paper in half, in half again, in half again, and in half once more.  Tear along each fold.  You should have sixteen pieces of paper.  Write the number 1/16 on each piece.


Now you have a complete fraction kit that serves to help students visually see fractions equivalence.  For example, students can now prove that 1/2 = 2/4 or 1/2 = 1/4 + 1/4 or 1/2 = 1/4 + 1/8 + 1/8.

If you enjoyed these bright ideas, please consider joining me on Facebook, Twitter, or Instagram for more ideas.

The Bright Idea bloggers also created a Pinterest board so all the great ideas from each month are housed in one place.  This is definitely a board to follow for great ideas.


For more bright ideas from a bunch of different bloggers, browse through the link-up below.  The titles give you a glimpse of the topic and grade level of each post, so you can choose the right ones for you.  Thank you so much for visiting today!

Monday, June 30, 2014

July Currently

Well, I haven't got my act together in a long time in order to join Farley's Currently linky.  So excited that I am getting it posted early!


My husband currently has control of the remote and is catching up on all of the YouTube channels that he is subscribed to, which means that I watching a blacksmithish show about creating weapons from video games, television, and movies.  It is actually pretty interesting as long as I know a little about the game or show.  However, I think he may be going deaf (he's only 35) because I am pretty sure I could go in the living room and hear the television in the bedroom perfectly fine.  I may get him hearing aids for his birthday.

Summer break!  I don't think I really have to explain that one.  :)

I am participating in some pretty great book studies this summer.  I just posted my contribution to the Notice & Note book study (close reading strategies).  I am super excited to be in planning stages for a book study on Barbara Gruener's new book What's Under Your Cape.  I ordered the book from her site and she signed it!  I will get the book Wednesday or Thursday.  EXCITED!!!

I am changing jobs, which means that I need to find a new daycare for my daughter.  Sadface!  I love my daycare but it is not in the city where I lived (it was where I used to work).  It is not easy to find a good daycare.  We are on the waiting list, but I need one now not whenever we are next on the list.  It is a little stressful.  I have to go back to work on August 4.  I don't know what we are going to do if it isn't our turn yet.

Good news!  I love the Independence Day holiday!  We always visit my sister-in-law in Chattanooga and it always a ton of fun.  I hope everyone has a fantastic Fourth of July weekend (for my USA readers)!

Click on the button below to check out what everyone else is CURRENTLY doing.

Tuesday, June 24, 2014

Notice and Note: Anchor Questions

Summer time is my opportunity to catch up on professional texts that I put in my TBR pile during the year.  Notice & Note is one of those books and I am thrilled to be part of this bloggy book study put together by Dilly Dabbles

Why this book?  Close reading is an important strategy, but I have been having trouble with the 'prescribed steps' that you see everyone on the web:  first reading you do this, second reading you do this, etc.  Students are supposed to annotate the text in many of the close reading strategies.  What does that mean?  What are they supposed to be writing down?  What are they supposed to be noticing?  I knew there had to be a better way to help students through this process.  Beers and Probst helped make this process more explicit for me through their signposts.

Have you missed the beginning of the study?  Are you thinking:  What is a signpost?  Go HERE to see all the posts up to this point and then join in by commenting on this post or join the linky party with your own blog post.


I am sharing this section with the wonderful Kim from Finding JOY in 6th Grade.  After you have read about "The Anchor Questions," visit Kim to learn about "The Role of Generalizable Language."


Once students begin to notice the signposts, teachers start asking questions, lots of questions, about what they noticed.  However, this was making the students dependent on the teacher to develop their thinking instead of creating independent thinkers.  What was the problem?  TOO MANY TEACHER GENERATED QUESTIONS!  I know, sounds crazy right.  As an instructional coach, I am always working with my teachers on creating deeper, higher-level questions.  However, the ultimate goal is for STUDENTS to create the questions and become independent readers and thinkers.  If the teacher is the only one creating all the questions, then the teacher is the only one OWNING the questions.

What to do????

Students need a focus, or ANCHOR, question in "their repertoire, they need to be able to apply it appropriately, and they need to let it lead them to other questions" (page 77).  Did you notice the important word "a"?  Not a ton of questions for each signpost - just ONE.  There is no way students would be able to internalize a laundry list of questions, but ONE questions is definitely doable.  "When prompted to consider the anchor question, the student[s] began making inferences, making connections, and offering" predictions (page 78).  What students learn from the question deepens their thinking.  Just noticing the signpost is NOT enough!

Two of the signposts that I find the most often when I am reading fiction texts are "contrasts and contradictions" and "again and again."


Read about the next step in this process by visiting Kim and learning about "The Role of Generalizable Language" (click on the blog button below).

joyin6th Homepage

Saturday, April 12, 2014

Bright Ideas: Popsicles Sticks Galore

Life has been absolutely crazy since I have become a mother.  On top of that, school life is busier than ever with teacher evaluations (I don't like doing them as much as you don't like having them done) and state testing, testing, testing.  I am pretty sure I spend the last nine weeks of school organizing one test or another (district test coordinator).  However, one of the bright spots is the Bright Ideas link up each month.  I hope that you have enjoyed the last two as much as I have.  If you missed them, no fear, check them out HERE and HERE.  I have filed away a ton of useful ideas for next year and found some great ideas to finish the year strong.


Today I am here to talk to you about popsicle sticks.  They come in a variety of colors and sizes.  Almost every teacher has them in his or her room.  There are a ton of ways to use them, and I am going to share a few of my favorite with you.

Engaging Fluency Practice in Math

Common Core Standards that apply to fluency:

*Kinder
     + add and subtract within 5
*First
     + Add and subtract within 20, demonstrating fluency for addition and subtraction within 10
*Second
     + Fluently add and subtract within 20 using mental strategies
     + Fluently add and subtract within 100 using strategies based on place value, properties of
         operations, and/or the relationship between addition and subtraction.

*Third
     + Fluently multiply and divide within 100 know from memory all products of two one-digit
          numbers
     + Fluently add and subtract within 1000 using strategies and algorithms based on place value,
          properties of operations, and/or the relationship between addition and subtraction.

*Fourth
     + Fluently add and subtract multi-digit whole numbers using the standard algorithm.
*Fifth
     + Fluently multiply multi-digit whole numbers using the standard algorithm.
*Sixth
     + Fluently divide multi-digit numbers using the standard algorithm
     + Fluently add, subtract, multiply, and divide multi-digit decimals using the standard algorithm
         for each operation.

Engaging Ideas:

Activity 1
Students need fun ways to practice their fluency in math facts.  I pinned this 
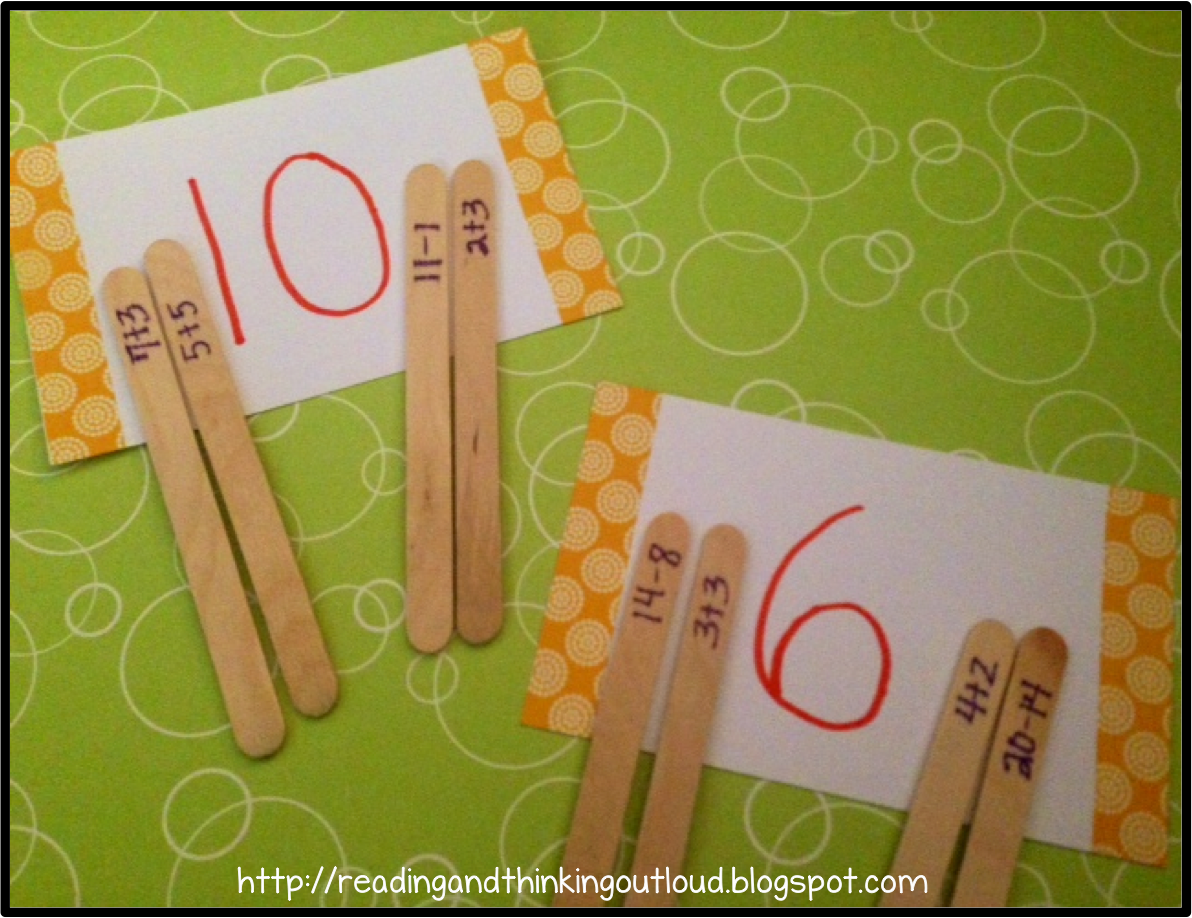
fabulous idea from First Grade Parade a looonng time ago.  The little pumpkins are fun and festive for fall or Halloween, but I needed something that I could use all year and that I could store flat in a file folder or binder.  Instead of containers, I used index cards to write the numbers on and I fancied them up a bit with some washi tape.  Now everything fits in a small ziploc bag.

 I work with different grade levels, and I was able adapt the activity as I moved between groups of students.  In K-3, I put the sum/difference/product/quotient on the index card and the equations on the popsicle sticks.
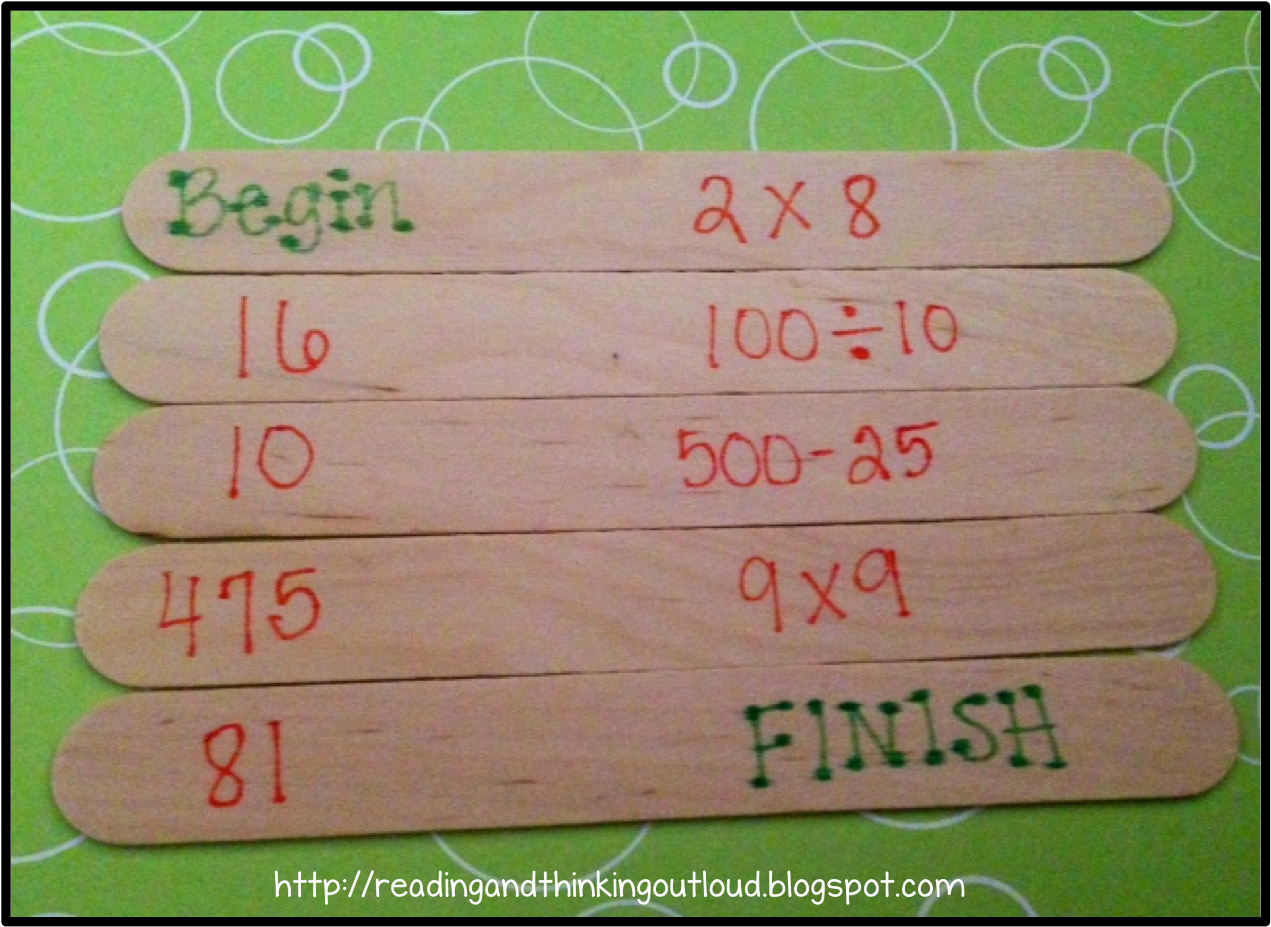

Activity 2
I wanted a way to use the concept of I Have, Who Has but individually.  This worked really great with the 3-6 students in helping them becoming more fluent with bigger numbers and get practice using all four operations.


Multiple Ways to Group Students

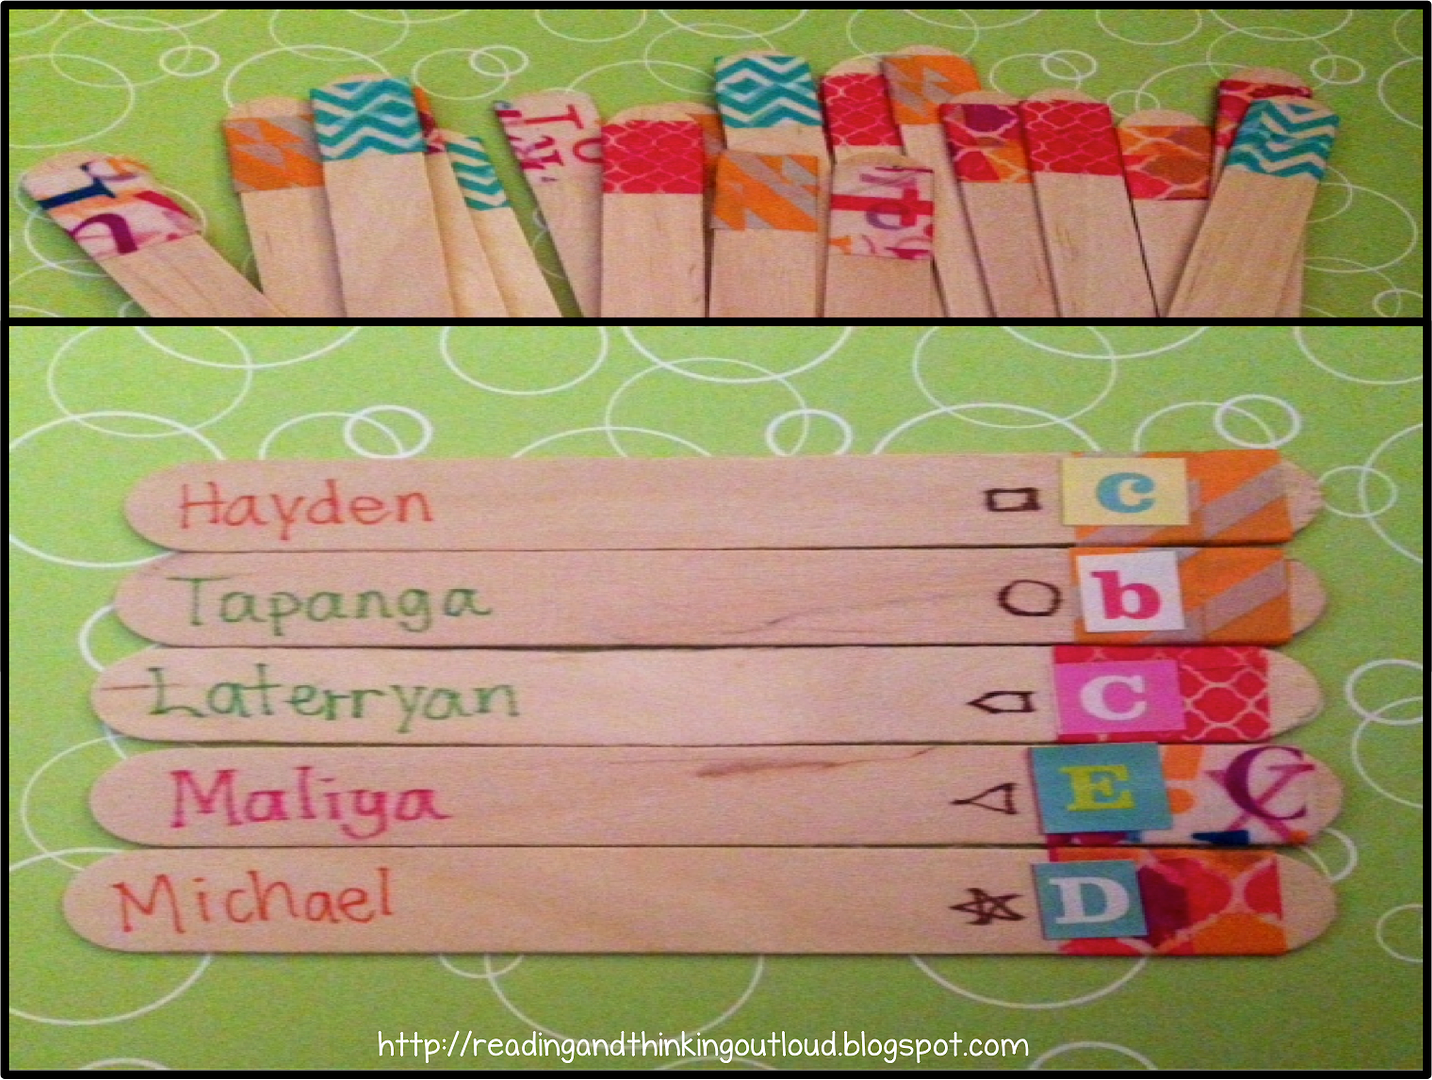
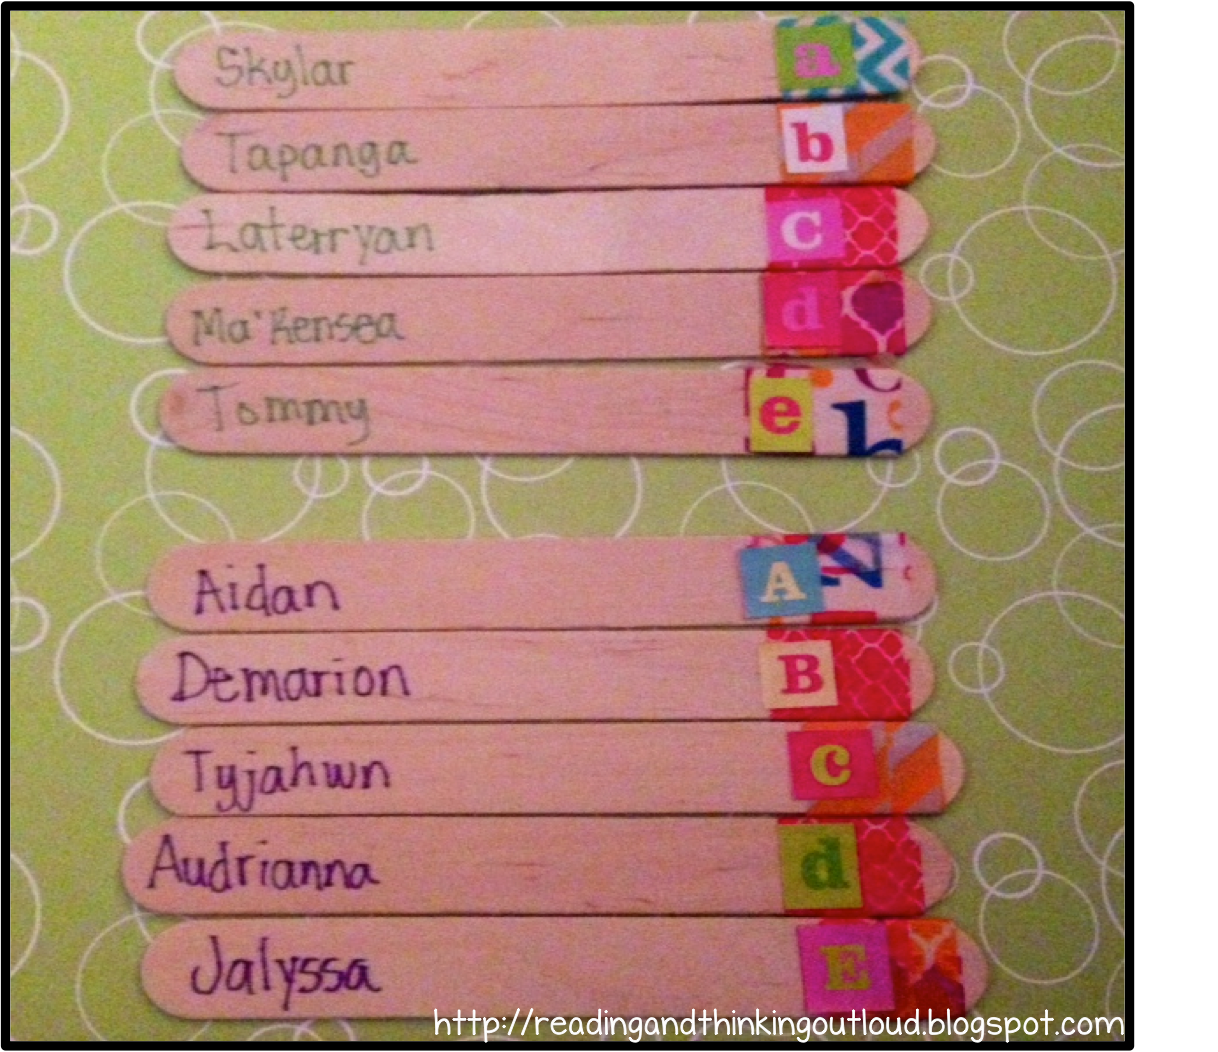
Along with working with small groups of different grade levels, I also work with one second grade class.  Every student has a popsicle stick with their name on it.  I use them to make sure I am calling on a variety of students instead of the same ones every time.  I also use them to group students.  At the other end of their stick I have different symbols that allow me a variety of ways to quickly group students.

I can group students by:

the type of washi tape - This was created to be completely random.  I put the washi tape on the stick first, mixed them up, and put them upside down in a cup.  Then I randomly drew a stick out and wrote the students' name on the stick.  Thinking ahead to next year, I am going to type the student names on small address labels, so I can use the same sticks year to year.  Then each year I just have to put a new label on top of the old one.

the shape - After I had student names on the sticks, I laid them out and grouped them based on specifically to make sure that I had one strong reader in each group.  I was working with the students on citing evidence this year, and we worked with some short passages that were a little above where most of the students were reading.  Knowing I had one strong reader allowed me to use those passage for group work as well as my model.


color of their name along with letter on washi tape - In the instances that I wanted to use a jigsaw with my students, I wanted to make sure that I could quickly put them into groups and also give students a reminder of where to report back to for home group.  The color the student's name was written in indicates the home group.  The letter on the washi tape indicates the expert group.


If you enjoyed these bright ideas, please consider joining me on Facebook, Twitter, or Instagram for more ideas.

The Bright Idea bloggers also created a Pinterest board so all the great ideas from each month are housed in one place.  This is definitely a board to follow for great ideas.


For more bright ideas from 150 different bloggers, browse through the link-up below.  The titles give you a glimpse of the topic and grade level of each post, so you can choose the right ones for you.  Thank you so much for visiting today!


Sunday, March 9, 2014

Bright Ideas: KWL Plus Chart

Today is a BRIGHT idea day.  It is time to grab a cup of coffee (or your favorite beverage...my would be Dr. Pepper) and wander your way through the bright ideas brought to you by some great blogger friends.  I love this Bright Idea hop because it isn't about freebies; it isn't about products; it IS about sharing with you great ideas that you can immediately implement in your classroom to help you and your students.


My bright idea began with wanting to help the students in my school be better organized as they read nonfiction texts in order to conduct research about a specific topic.  One of the ways I introduced to my teachers (as an instructional coach) to help their students is through an expanded KWL chart.


Many of the students were already familiar with a KWL charts, but I wanted to make sure we were all on the same page.  I had my teachers introduce (in preschool) and review (in kindergarten through third grades) the basic KWL chart.


One of the preschool teachers took the KWL chart and made it work for students in a couple of ways.  She had "Today we are going to read about ______" already on the chart along with the green question (What do you know about girafffes) and the blue question (What do you wonder about giraffes).  She showed them the Giraffes book (LOVE the cover...talk about grabbing students' interests) and had them share what they thought they knew about giraffes while she wrote a few on the chart.  Then she told them to think about what they wanted to know - what they wondered about giraffes.  They are four years old and struggle with asking questions, so she gave them some stems to help them out.


I have one teacher who teaches a combined kinder and first grade class.  She made the KWL chart her own also.  She went through the same process but with a book about seeds.  They completed the whole thing as a class.


One of my third grade teachers chose to put each part of the KWL on a different piece of small chart paper and used bulletin board letters to put "know, wonder, learn."  In third grade, students are more independent and each student wrote on a sticky note what they knew and wondered before the book was read.  Then they came to the front of the room and put the sticky notes on the chart.  After the teacher read multiple excerpts about Abe Lincoln. they put what they learned.

Let me stop a minute and talk about the LEARN category.  Students are not just putting random facts they learned after the book is read.  Students are putting information that MATCHES their WONDER questions in the learn column.  The whole point of this chart is to help students organize their research about a topic, so any random fact will not help with the research.  The students have a purpose for listening/reading because of their SELF-GENERATED questions.  They are more MOTIVATED to listen/read because they want to know something about the topic.

Now, here comes the expanded portion.

Expanded KWL

Students are moving their wonder questions to the learn column if their question is answered during the reading.  Students are also moving the information in the KNOW column to two new columns:  CONFIRM and MISTAKEN.  After the reading, students reexamine what they thought they knew and decided if it was:  CONFIRMED (text gave evidence that what they wrote down was true) or MISTAKEN (text gave evidence that what they thought they knew was incorrect).  If the know sticky note could not be confirmed or denied, then it stayed in the know column.


All of my teachers, except the preschool, added cofirmed and mistaken to their KWL charts.  One of my third grade teachers thought the two categories were best put under the know column (like you see above).  One of my first grade teachers put the confirm column after the know and the mistaken after the learn (like in the picture below).


Next up on the Bright Ideas blog hop is Julie from Second Grade Style.  She has a wonderful post on tips for keeping a clean classroom.  Just click on the button below to check it out!


Want some other BRIGHT IDEAS?  Check out the linkies below.  There is a K-2 group and 3+ group.  Each blogger put the idea they are sharing as the title, so you can pick and choose what you would like to read about today.  ENJOY!

An InLinkz Link-up

Saturday, March 1, 2014

Saturday Night Teacher Feature - Curious Firsties


Being a teacher can be so difficult.  Aside from just day to day teaching, we have to attend meetings, talk with parents, fill out paper work, find and create materials, grade papers, plan, plan, plan, etc. etc. etc!  Often times it seems that we cannot do enough.


Today, several of my teacher friends are taking some time out to recognize how hard every teacher works.  We have had the amazing opportunity to get to know each other, share ideas, and learn from each other.   Today is our day to "feature" other teachers and recognize their amazing work!  I am recognizing Em from Curious Firsties.


Em became a teacher because she was the oldest child in her family and it came natural to her to teacher her siblings.  She has taught first and second grade for 10 years.  For five of those years she has been a Title I teacher for first grade and specialized in Reading.  She earned her Masters Degree in Second Language Literacy.  She loves to teach in a small group format, especially guided reading because it is a fun challenge to help each student reach their reading potential.

Em is from Cincinnati - living her whole life in Ohio, except for 2 years in Knoxville, TN.  She met her husband in high school, and they have been together for 17 years now, with this being their eleventh year of marriage.  I have two little blonde haired girls - one is 5 and one is almost 4.  She loves to bake, and she cooks about one-two NEW recipes each week.  (Holy cow!  I am good to make dinner once a week!)  She spends fifty percent of her summer at the local amusement park.

Here are her " Top 3 Greatest Hits!"


Curious Firsties wrote two fabulous blog posts on improving student fluency.  First, she describes how she makes fluency CONCRETE.  She explains, "We wanted to really illustrate how we group our words naturally when speaking and that doing this when reading allows us to read fluently.  We wanted to also explain that fluency allows your brain to think about what you are reading (metacognition)."  After reading the book, Wolf, she had had the students each become a word in a sentence from the book.  What she does after that is fantastic.  I am not going to tell you because I want you to go check our her post by clicking HERE.  In another post she builds on that lesson by restructuring how she teaches fluency on a daily basis by using poetry.  She explains, "Here are my goals:  increase fluency and phrasing, provide a purpose for reading, and keep their eyes on the text.  So I have started using poetry (mostly nursery rhymes) at the beginning of each small group.  But one of my concerns was that the students would quickly memorize the poem, instead of focusing their eyes on the text.  Because of this concern, I came up with this weekly schedule."  What is that weekly schedule, click HERE to find out.


The Case of the Missing Nursery Rhymes can be used as a classroom activity or it would make a wonderfully fun activity for a Parent Literacy Night.  After students read the nursery rhyme book with you, they will record three mystery clues. Then they will analyze those clues to determine which nursery rhyme they would be matched with.

http://www.teacherspayteachers.com/Product/The-Case-of-the-Missing-Nursery-Rhymes-749396

Looking for more great literacy ideas, check out her store HERE.


In her Heart Diagram Word Sort, students use the Venn diagrams to sort twelve words.  There are two versions of each word sort to help you differentiate for your classroom of students.  She also included one colorful Venn diagram.  The following phonics patterns are covered:  long and short vowels, consonant digraphs ch/ck, and consonant blends nk/ng.

http://www.teacherspayteachers.com/Product/Word-Sorts-with-Heart-Venn-Diagrams-1071420


LinkWithin

Related Posts Plugin for WordPress, Blogger...